This is a tutorial where we will jump into the world of automation testing for Microsoft Copilot Studio walking you through a comprehensive guide for users that are looking to streamline their testing process for manual topics. This blog post will cover the essentials of writing effective tests and demonstrate how to execute them efficiently.
The walkthrough also includes practical examples and utilizes the Copilot Studio Test Framework, highlighting its features like testing utterances, validating topic triggering etc. This post is perfect for both beginners and experienced users, and this tutorial will enhance your skills in ensuring the reliability and quality of your manual topics with Copilot Studio. Allowing you to focus on Generative AI!
Before we get started just a quick shoutout to Henry Jammes and team for making this!
Where to Start
You can either watch this easy to follow how-to walkthrough video or scroll down for the text-based guide, or if you have come here from YouTube, you can find all of the code in the text guide below.
Video
Text-Based Guide
We’re going to be using four different types of programs and technologies, they’re:
- GitHub
- PowerShell
- Copilot Studio
- NotePad++
Downloading the Automation Framework
Firstly, we need to download the latest automation framework application so that we can convert and run our tests. This is an EXE application and will only run on Windows, so unless you want to rewrite the application for MacOS, you will need to use a VM if you’re on a Mac.
The entire codebase for the automation framework is open-source so you can modify the code or add additional commands if you wish by simply forking the repository. However, we will just be downloading the EXE in the guide. To get this you need to click here to directly download or go to the GitHub repo here and click ‘Raw’.
Add this to a folder called CopilotTestFramework on your desktop (or any location you wish to use).
Creating a Test Script
The tests are written in a way to test the user input and response. This can test triggers, nodes and more. Essentially you’re writing your test as both the user’s input and the copilot’s (or bot’s) response.
To do this you will write something similar to that shown below (this example is from the video above):
user: <input> allows you to mimic what a user would do and anything you put here will be like you’re typing it in to a copilot window.
bot: <output> allows you to put what you expect the copilot to respond with, allowing you to validate a response.
<EOC> represents <End of Conversation> signaling that the conversation has ended and therefore so has the test. This is how you mark the end of a test.
You can type out multiple tests one after another such as:
However, it’s recommended that you separate your tests into files that represent a path or a topic. You can then keep track of all of your testing scripts much more easier.
Now you need to save the file, this should be saved as a .chat file type. Just add .chat on the name of your file (in this example we will use test-script.chat. This should be saved in the same location as the automation studio.
Converting the Test Script
Now we have our .chat test script file (or files) we need to convert it to a .json file. You can write the json yourself and avoid the .chat file type, but it’s much more complicated and I completely recommend using the .chat file way.
To convert we need to use PowerShell and the automation framework application.
Open PowerShell in the directory where your test script and automation framework application is, you can do this easily by holiday shift and right-clicking in the folder then select ‘Open PowerShell window here’.

Now we need to run a script that tells the framework to convert the .chat file into .json. Use the script below (copy and paste) and simply rename the path and outputFile if you wish to change these or saved them different to this example.
.\PVATestFramework.exe convertChatFile --path test-script.chat --outputFile test-script.jsonThis will then convert the .chat file to .json and provide you with a message once completed (as seen below):

Getting the Token Endpoint
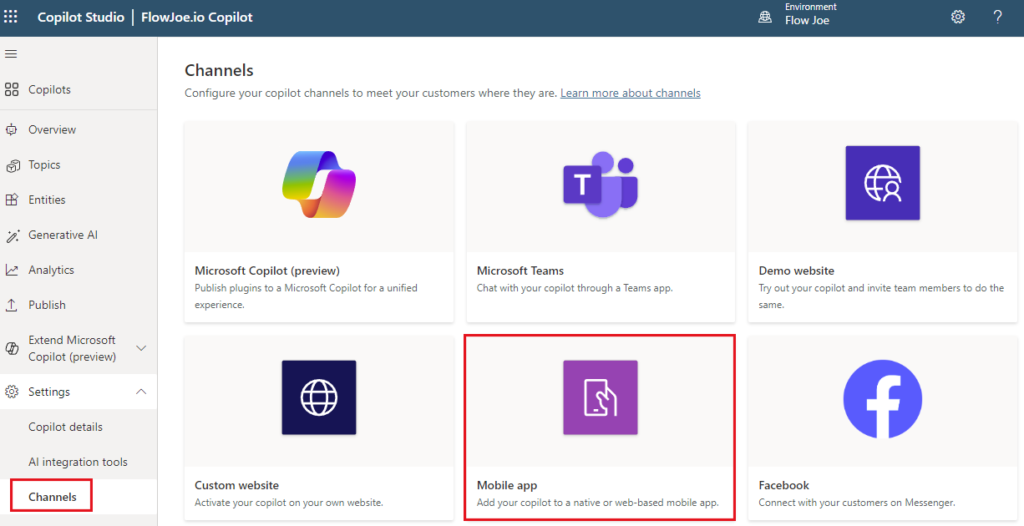
Now we have our file converted we need to get the Token Endpoint to allow us to connect to Copilot Studio. To do this open the Copilot Studio designer, select ‘Settings’, then select ‘Channels’ and then finally ‘Mobile App’ (shown below).

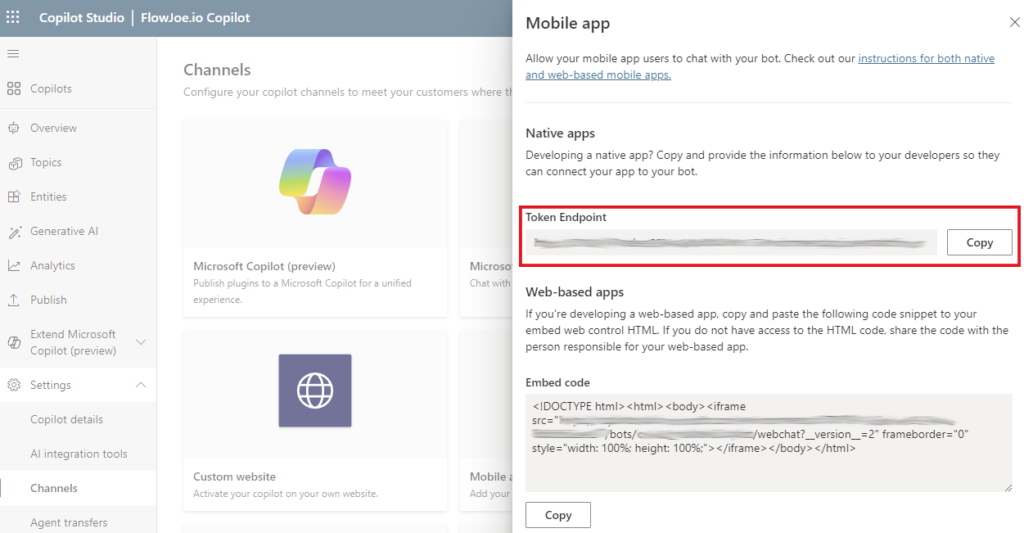
This will open up a side panel where you can copy the token endpoint. You should paste this into a notepad for use in the next stage.

Running the Tests
Similar to wen we were converting our tests we need to use PowerShell and the automation framework again, this time targeting our .json file as well as our token endpoint, causing the tests to be run against Copilot Studio.
Modify the code below to the .json file name of your own if you changed in during this process, otherwise you can copy the code below and replace the YOURTOKENENDPOINT section with the token endpoint we copied in the previous step.
.\PVATestFramework.exe test --path test-script.json --tokenEndpoint YOURTOKENENDPOINT --log --verboseThen simply paste it in to your PowerShell terminal window. It should look something like:

Once you press enter, the tests will begin and provide you with an update on the status during the run and once it is completed.

The Results
You can get a list of the results in an Excel document that’s produced in the same folder as where you placed your test scripts and automation framework. You can also see the results directly on the PowerShell terminal as shown above (I do this when I’m just checking to see if I’ve broken anything!).
Thanks for Reading
Thanks for reading this content, every item of content I make is completely free and if you have any questions please feel free to leave a comment on the video linked above and if you’re feeling really generous hit that subscribe button while you’re there too!
