This blog post is a follow-on from the previous post ‘Creating a Custom Connector in 7 Steps’. The aim of this post is to demonstrate how we can cycle through data, pulling it out and using it with a custom Flow. We will use the Custom Connector previously used (Companies House – Company Search) and search for ‘Microsoft’, then cycle through the returned results (JSON) to find the Microsoft Office located in my local city (Cambridge, UK). Once I have the information I’ll map the data to appropriate headings and produce a HTML table to display the data in a refined view to a user. While I still have limited knowledge with other PowerPlatform areas, rather than making a HTML Table, this is where I would pass the data to the relevant platform.

Where To Start
If you haven’t created the Companies House connector and you’re using your own, things may differ slightly but the principals should remain very similar.
To start with we need to simply create a custom Flow from blank.
Trigger Setup
My chosen trigger when learning is a manual trigger as I have full control over it. Therefore, next we want to add our first action, ‘Manual Trigger’. When triggering our flow we want to be able to pass some form of information in to allow us to search for the city. To do this, once your trigger action is added, click the ‘+ Add an Input’ button, select ‘String’ and assign an appropriate name to it. I named my String entry as ‘Location’ (shown below)

Location Variable
For us to have access and use the String (Location) that was submitted with the trigger throughout our Flow, we need to store that information in a variable (var). To do this, add another action ‘Initialize Variable’, I named my var ‘Location’ as it is simply taking the initial ‘Location’ value and will effectively be replacing it. You then need to select a type, as before with the trigger we will still be using a String here. Then you simply pass the value (‘Location’) in from the trigger which can be seen below:

Set Up The Custom Connector
We now have a trigger to start the Flow, an input to take a city name and we’re storing that input.
Now we need to search our custom connector. We can also add another input to the trigger such as ‘Company’ then pass that to another ‘Company’ var, but for the purpose of this blog post I’ve hardcoded ‘Microsoft’ as the company (shown below).

Another Var! (Store The Company We Want)
With Power Automate, you’re unable to initialize a var within a control so I need to initialize another var here to pass the data into so that I can separate the company information I want from the initial data returned. Add another ‘Initialize Variable’ action and give it an appropriate name, I went with ‘Companies Wanted’ as I’m simply storing the companies I want! You should then choose the type ‘Array’, this will allow us to store multiple values into one var; such as a name, telephone number, address etc (see below).

Cycling Through The Data
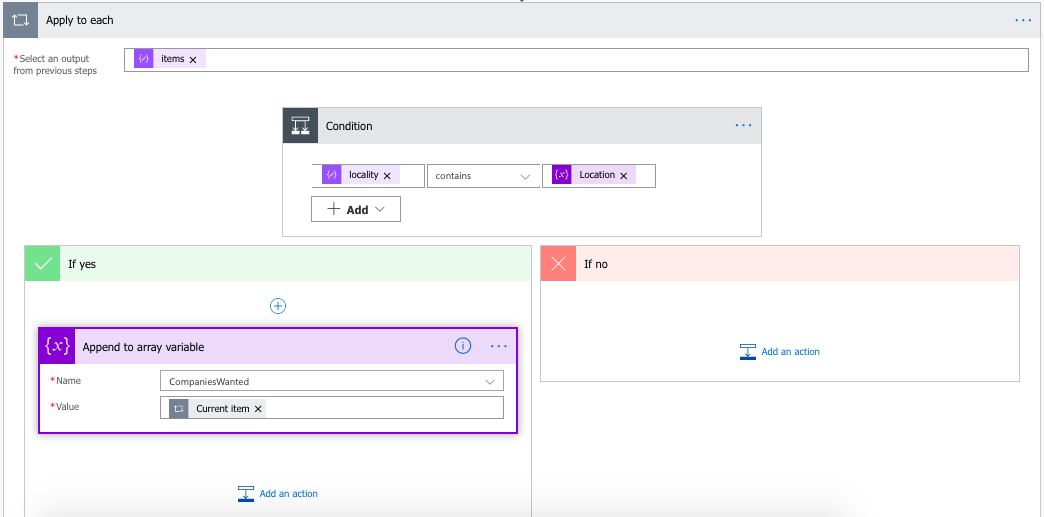
Now, we’re at the point where we have everything ready to start cycling through the data. The first thing we need to do is create an action ‘Apply To Each’ and place ‘Items’ into the ‘Select an output from previous steps’ field.

What this is doing is pretty much a ForEach loop. For each item(company) in the items list(companies list) I want to run a condition against that company. This will allow use to run an if statement on that company; If the company is located in Cambridge (Yes) we will do something, else if there is no location ‘Cambridge’ for the current company we will do nothing (No). The IF statement was discussed in a previous post here, but you can check out the workflow below:
To set this IF statement up, we want to use ‘locality’ as it is the section of the JSON Array that has the city of each company, it will display the current city for the current item in the ForEach loop. We then want to select ‘Contains’ as we want to make sure that the current locality contains ‘Cambridge’ and then we want to set the value as the initial var we created ‘Location’. This will pass what the user enters during the trigger to our if statement, in this case is it ‘Cambridge’.

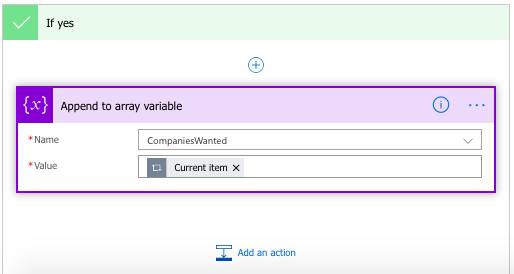
So we find a company with ‘Cambridge’ and we’re in the ‘If Yes’ section, what next? Well we want to move the information of the ‘Current Item’ into our previously created ‘CompaniesWanted’ var. To do this we add an action called ‘Append to Array Variable’, pass the CompaniesWanted var into the ‘Name’ field and the ‘CurrentItem’ autogenerated var into the value.

The entire workflow for the cycling through the data can be seen below:

Mapping The Data
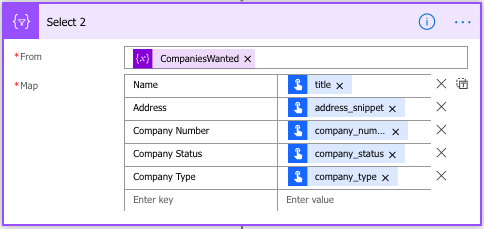
Now we just need to map the data to some appropriate headers. To do this add a ‘Select’ action, we want to assign column headings, and add the ‘CompaniesWanted’ var in the ‘From’ field, this will pass the data from that variable into our select.
We now want to add the names of the columns and then select the value we wish to display under those columns. At this point, I ran a test of my flow to see the information returned in my ‘CompaniesWanted’ so that I knew what field names I needed (see the returned JSON below)
    [
      {
        "date_of_creation": "1997-05-12",
        "title": "MICROSOFT RESEARCH  LIMITED",
        "company_type": "ltd",
        "links": {
          "self": "/company/03369488"
        },
        "snippet": "",
        "description": "03369488 - Incorporated on 12 May 1997",
        "company_status": "active",
        "company_number": "03369488",
        "address_snippet": "21  Station Road, Cambridge, CB1 2FB",
        "kind": "searchresults#company",
        "matches": {
          "snippet": [],
          "title": [
            1,
            9
          ]
        },
        "address": {
          "locality": "Cambridge",
          "premises": "21 ",
          "address_line_1": "Station Road",
          "postal_code": "CB1 2FB"
        },
        "description_identifier": [
          "incorporated-on"
        ]
      }
    ]
I then mapped several columns that I wanted to see to the names of headers for their columns, for example, I wanted the full address to be displayed so I entered the column name ‘Address’ and then used the var ‘address_snippet’ (see below).

Displaying The Data
We now have out data mapped and we just need to display the data. Just add an action of ‘Create HTML Table’ and pass the ‘Output’ (auto-created var from the Select action above it)

If you now run a test you can see the results! You’ve now manipulated returned data from your first custom connector, with a custom Flow. Then displaying that data to a user in a HTML table output!

